This week my at home bookbinding tutorial was Dugg. Tens of thousands of the readers stopped by to find out how they could bind ebooks into paperback books. So far, it’s the top story this week for the Mods category. If you liked my method and haven’t Dugg it yet, please submit a Digg. I think it has a good chance of being the top for the month – currently it’s in second place. ![]()
One of the questions posed was how to make their own bookbinder. I’ve been very busy this week so I didn’t have time to put together a followup, but “Inventor” came to the rescue by posting a good explanation of parts needed and how to put them together. If you use the pictures from the original post it should be a pretty good walkthrough.
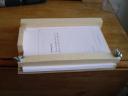
Ok! Let’s see if I can help everyone build the clamp.
When you brake it down to the parts it’s really easy.
You can use pine/plywood (one side Good, (The paper side))
or MDF board. (Might be MFD! can never remember this one)
Part List:
Base Plate: 1″X10″X6″
Back Stop: 1″X2″X10″
Side Stop: 1″X2″X4″
Clamping Bar: 1″X1″X10″ (Option: 14″ to give you a handle)
Bolts: 2- 1/4-20 X 3″ or 3-1/2″ Carriage Bolts
Washers: 2- 1/4″ Flat washers
Nuts: 2- 1/4-20 Wing nuts
A bottle of “Gorilla Glue”Now with the base laying 10″ left to right – Measure in 5/8″
from the left edge and from the front edge; mark and drill a 1/4″
hole, then repeat on the right corner.Next Take your clamping bar and center it over the two holes and
flush with the left edge – clamp in place and drill thru from the back
of the base plate.Next turn the base plate around and using the “Gorilla Glue” glue
the 10″ long stop block making sure the 2″‘s is up and all edges are
flush.Next center the 4″ stop block on the left edge and glue that in place.
Last step! insert the carriage bolts then put a flat washer over the bolt
and the wing nut and tighten it down to “pull” the square head into
the board.You’re “DONE”!!! You now have you clamp.
Thanks to Inventor for posting!
For more information on simple at-home bookbinding, grab the Easy Bookbinding Course by Nathan De Stephano
Technorati Tags: bookbinding, DIY, books, ebooks, fun, projects


{ 6 comments }
I love you man! I’m going to print and bind a kids book for barely anything thanks to you, and try to sell it, wish me luck!
Yaakov, best of luck with your book publishing. But need I remind you…The instructions were free, but part of the agreement was you sent me one of the books you authored.
Thanks so much for the idea, I love it and am going to make one of these soon. I have one question though, will this work with standard 8.5×110.5 paper and if not how to I adjust the formula?
Sandy, if I’ve done my math right you just need to double the size of your base plate to 15 x 10 or so. I would recommend cutting the back and side stops first and then laying some paper down to make sure it’s the right size before cutting.
I found your wonderful article a few months ago and loved it. I knew I would need it for a project and kept it in mind. Now that I’m upon the project, I find out that your selling the information. Granted, that is your right. However, I feel like this really goes against the spirit of Digg and other similar sites. It’s great the article was dugg so high, as it should have been, but now I can’t help but feel you turned against the very people who made this article and your site so popular. This saddens me greatly. I guess I’ll think twice about the sites I digg!
Nice idea.Now I want to bind a proper notebook with my own templated pages inside..
{ 4 trackbacks }